Overview
Kafka is one of the most popular sources for ingesting continuously arriving data into Spark Structured Streaming apps. However, writing useful tests that verify your Spark/Kafka-based application logic is complicated by the Apache Kafka project’s current lack of a public testing API (although such API might be ‘coming soon’, as described here).
This post describes two approaches for working around this deficiency and discusses their pros and cons. We first look at bringing up a locally running Kafka broker in a Docker container, via the helpful gradle-docker-compose plug-in. (Side note: although our examples use Gradle to build and run tests, translation to Maven “should be” (TM) straightforward.) This part of the article assumes basic knowledge of Docker and docker-compose. Next we look at some third party (i.e., unaffiliated with Apache Kafka) libraries which enable us to run our tests against an in-memory Kafka broker. In the last section we will look at some of the upgrade issues that might arise with the embedded / in-memory Kafka broker approach when we migrate from older to newer versions of Spark. To start off, we’ll walk you through building and running the sample project.
Building and Running the Sample Project
Assuming you have Docker, docker-compose, git and Java 1.8+ installed on your machine, and assuming you are not running anything locally on the standard ports for Zookeeper (2181) and Kafka (9092), you should be able to run our example project by doing the following:
git clone git@github.com:buildlackey/kafka-spark-testing.git
cd kafka-spark-testing
git checkout first-article-spark-2.4.1
gradlew clean test integrationTest
Next, you should see something like the following (abbreviated) output:
> Task :composeUp
    ...
Creating bb5feece1xxx-spark-testing__zookeeper_1 ...
    ...
Creating spark-master               ...
    ...
Creating spark-worker-1             ... done
    ...
Will use 172.22.0.1 (network bb5f-xxx-spark-testing__default) as host of kafka
    ...
TCP socket on 172.22.0.1:8081 of service 'spark-worker-1' is ready
    ...
+----------------+----------------+-----------------+
| Name           | Container Port | Mapping         |
+----------------+----------------+-----------------+
| zookeeper_1    | 2181           | 172.22.0.1:2181 |
+----------------+----------------+-----------------+
| kafka_1        | 9092           | 172.22.0.1:9092 |
+----------------+----------------+-----------------+
| spark-master   | 7077           | 172.22.0.1:7077 |
| spark-master   | 8080           | 172.22.0.1:8080 |
+----------------+----------------+-----------------+
| spark-worker-1 | 8081           | 172.22.0.1:8081 |
+----------------+----------------+-----------------+

    ...

BUILD SUCCESSFUL in 39s
9 actionable tasks: 9 executed
Note the table showing names and port mappings of the locally running containers brought up by the test. The third column shows how each service can be accessed from your local machine (and, as you might guess, the IP address will likely be different when you run through the set-up).
Testing Against Dockerized Kafka
Before we get into the details of how our sample project runs tests against Dockerized Kafa broker instances, let’s look at the advantages of this approach over using in-memory (embedded) brokers.
- Post-test forensic analysis. One advantage of the Docker-based testing approach is the ability to perform post-test inspections on your locally running Kafka instance, looking at things such as the topics you created, their partition state, content, and so on. This helps you answer questions like: “was my topic created at all?”, “what are its contents after my test run?”, etc.
- Easily use same Kafka as production. For projects whose production deployment environments run Kafka in Docker containers this approach enables you to synchronize the Docker version you use in tests with what runs in your production environment via a relatively easy configuration-based change of the Zookeeper and Docker versions in your docker-compose file.
- No dependency hell. Due to the absence of ‘official’ test fixture APIs from the Apache Kafka project, if you choose the embedded approach to testing, you need to either (a) write your own test fixture code against internal APIs which are complicated and which may be dropped in future Kafka releases, or (b) introduce a dependency on a third party test library which could force you into ‘dependency hell’ as a result of that library’s transitive dependencies on artifacts whose versions conflict with dependencies brought in by Spark, Kafka, or other key third party components you are building on. In the last section of this post, we will relive the torment I suffered in getting the embedded testing approach working in a recent client project.
Dockerized Testing — Forensic Analysis On Running Containers
Let’s see how to perform forensic inspections using out of-the-box Kafka command line tools. Immediately after you get the sample project tests running (while the containers are up), just run the following commands. (These were tested on Linux, and “should work” (TM) on MacOS):
mkdir /tmp/kafka
cd /tmp/kafka
curl https://downloads.apache.org/kafka/2.2.2/kafka_2.12-2.2.2.tgz  -o /tmp/kafka/kafka.tgz
tar -xvzf kafka.tgz  --strip 1
export PATH="/tmp/kafka/bin:$PATH"
kafka-topics.sh  --zookeeper localhost:2181   --list
You should see output similar to the following:
__consumer_offsets
some-testTopic-1600734468638
__consumer_offsets is a Kafka system topic used to store information about committed offsets for each topic/partition, for each consumer group. The next topic listed — something like some-testTopic-xxx — is the one created by our test. It contains the content: ‘Hello, world’. This can be verified by running the following command to see what our test wrote out to the topic:
kafka-console-consumer.sh    --bootstrap-server localhost:9092   \
                 --from-beginning  --topic some-testTopic-1600734468638
The utility should print “Hello, world”, and then suspend as it waits for more input to arrive on the monitored topic. Press ^C to kill the utility.
Dockerized Testing — Build Scaffolding
In the listing below we have highlighted the key snippets of Gradle configuration that ensure Docker and ZooKeeper containers have been spun up before each test run. Lines 1-4 simply declare the plug-in to activate. Line 7 ensures that when we run the integrationTest task the dockerCompose task will be executed as a prerequisite to ensure required containers are launched. Since integration tests — especially those that require Docker images to be launched, and potentially downloaded — typically run longer than unit tests, our build script creates a custom dependency configuration to run such tests, and makes them available via the separate integrationTest target (to be discussed more a little further on), as distinct from the typical way to launch tests: gradlew test.
Lines 10 – 17 configure docker-compose’s behavior, with line 10 indicating the path to the configuration file that identifies the container images to spin up, environment variables for each, the order of launch, etc. Line 13 references the configuration attribute that ensures containers are left running. The removeXXX switches that follow are set to false, but if you find that Docker cruft is eating up a lot of your disk space you might wish to experiment with settings these to true.
plugins {
  ...
  id "com.avast.gradle.docker-compose" version "0.13.3"
}


dockerCompose.isRequiredBy(integrationTest)

dockerCompose {
  useComposeFiles = ["src/test/resources/docker-compose.yml"]

  // We leave containers up in case we want to do forensic analysis on results of tests
  stopContainers = false
  removeContainers = false  // default is true
  removeImages = "None"     // Other accepted values are: "All" and "Local"
  removeVolumes = false     // default is true
  removeOrphans = false     // removes contain
}
The Kafka-related portion of our docker-compose file is reproduced below, mainly to highlight the ease of upgrading your test version of Kafka to align with what your production team is using — assuming that your Kafka infrastructure is deployed into a Docker friendly environment such as Kubernetes. If your prod team deploys on something like bare metal this section will not apply. But if you are lucky, your prod team will simply give you the names and versions of the Zookeeper and Kafka images used in your production deployment. You would replace lines 4 and 8 with those version qualified image names, and as your prod team deploys new versions of Kafka (or Zookeeper) you simply have those two lines to change to stay in sync. This is much easier than fiddling with versions of test library .jar’s due to the attendant dependency clashes that may result from such fiddling. Once the Kafka project releases an officially supported test kit this advantage will be less compelling.
version: '2'
 services:
   zookeeper:
     image: wurstmeister/zookeeper:3.4.6
     ports:
       - "2181:2181"
   kafka:
     image: wurstmeister/kafka:2.13-2.6.0
     command: [start-kafka.sh]
     ports:
       - "9092:9092"
     environment:
       KAFKA_ZOOKEEPER_CONNECT: zookeeper:2181
       KAFKA_ADVERTISED_HOST_NAME: 127.0.0.1
     volumes:
       - /var/run/docker.sock:/var/run/docker.sock
     depends_on:
       - zookeeper
Dockerized Testing — Build Scaffolding: Running Integration Tests Separately
The listing below highlights the portions of our project’s build.gradle file which enable our integration test code to be stored separately from code for our unit tests, and which enable the integration tests themselves to be run separately.
sourceSets {
  integrationTest {
    java {
      compileClasspath += main.output + test.output
      runtimeClasspath += main.output + test.output
      srcDir file("src/integration-test/java")
    }
    resources.srcDirs "src/integration-test/resources", "src/test/resources"
  }
}

configurations {
  integrationTestCompile.extendsFrom testCompile
}


task integrationTest(type: Test) {
  testClassesDirs = sourceSets.integrationTest.output.classesDirs
  classpath = sourceSets.integrationTest.runtimeClasspath
}

integrationTest {
  useTestNG() { useDefaultListeners = true }
}

dockerCompose.isRequiredBy(integrationTest)
Lines 1-10 describe the integrationTest ‘source set’. Source sets are logical groups of related Java (or Scala, Kotlin, etc.) source and resource files. Each logical group typically has its own sets of file dependencies and classpaths (for compilation and runtime). Line 6 indicates the top level directory where integration test code is stored. Line 8 identifies the locations of directories which hold resources to be made available to the runtime class path. Note that we specify both src/test/resources (as well as src/integrationTest/resources) so any configuration we put under the former directory is also available to integration tests at runtime. This is useful for things like logger configuration, which is typically the same for both types of tests, and as a result is a good candiate for sharing.
Line 12 defines the ‘custom dependency configuration‘ integrationTest. A dependency configuration in Gradle is similar to a Maven scope — it maps roughly to some build time activity which may require distinct dependencies on specific artifacts to run. Line 13 simply states that that the integrationTest dependency configuration should inherit its compile
path from the testCompile dependency configuration which is available out-of-the box via the java plugin. If we wanted to add additional dependencies — say on guava — just for our integration tests, we could do so by adding lines like the ones below to the ‘dependencies’ configuration block:
dependencies {
   integrationTestCompile group: 'com.google.guava', name: 'guava', version: '11.0.2'
         …. // other dependenacies
 }
Line 17 – 20 define ‘integrationTest’ as an enhanced custom task of type Test. Tests need a
test runner, which for Gradle is junit by default. Our project uses testNG, so we declare this on line 23. (Side note: line 4 seems to state the same thing as line 13, but I found both were required for compilation to succeed).
We didn’t touch on code so much in this discussion, but as you will see in the next section the test code that runs against Dockerized Kafka brokers shares many commonalities with the code we wrote to test against embedded brokers. After reading through the next section you should be able to understand what is going on in ContainerizedKafkaSinkTest.
Embedded Broker Based Testing
We described some of the advantages of Docker-based testing of Kafka/Spark applications in the sections above, but there are also reasons to prefer the embedded approach:
- Lowered build complexity (no need for separate integration tests and docker-compose plug-in setup).
- Somewhat faster time to run tests, especially when setting up a new environment, as there is no requirement to downloaded images.
- Reduced complexity in getting code coverage metrics if all your tests are run as unit tests, within the same run. (Note that if this were a complete no-brainer then there would be not be tons of how-to articles out there like this.)
- Your organization’s build infrastructure might not yet support Docker (for example, some companies might block downloads of images from the “Docker hub” site).
So, now let’s consider how to actually go about testing against an embedded Kafka broker. First, we need to choose a third-party library to ease the task of launching said broker . I considered several, with the Kafka Unit Testing project being my second choice, and Spring Kafka Test ending up as my top pick. My main reasoning was that the latter project, being backed by VMware’s Spring team is likely to work well into the future, even as the Kafka internal APIs it is based on may change. Also, the top level module for spring-kafka-test only brought in about six other Spring dependencies (beans, core, retry, aop, and some others), rather than the kitchen sink, as some might fear.
With our test library now chosen let’s look at the code, the overall organization of which we present diagrammatically:
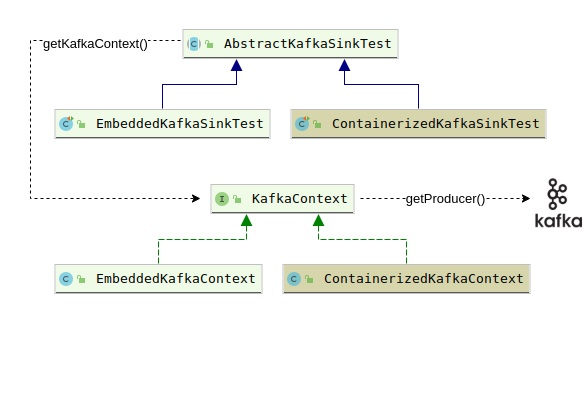
Our KafkaContext interface declares the getProducer() method to get at a Kafka producer which is used simply to send the message ‘Hello, world’ to a topic (lines 18-20 of the listing for AbstractKafkaSinkTest shown below). Our abstract test class then creates a Dataset of rows that return the single key/value pair available from our previous write to the topic (lines 23-28), and finally checks that our single row Dataset has the expected content (lines 32-37).
public abstract class AbstractKafkaSinkTest {
  final Logger logger = LoggerFactory.getLogger(AbstractKafkaSinkTest.class);

  protected static final String topic = "some-testTopic-" + new Date().getTime();
  protected static final int kafkaBrokerListenPort = 6666;

  KafkaContext kafkaCtx;

  abstract KafkaContext getKafkaContext() throws ExecutionException, InterruptedException;

  @BeforeTest
  public void setup() throws Exception {
    kafkaCtx = getKafkaContext();
    Thread.sleep(1000);           // TODO - try reducing time, or eliminating
  }

  public void testSparkReadingFromKafkaTopic() throws Exception {
    KafkaProducer<String, String> producer =  kafkaCtx.getProducer();
    ProducerRecord<String, String> producerRecord = new ProducerRecord<String, String>(topic, "dummy", "Hello, world");
    producer.send(producerRecord);

    SparkSession session = startNewSession();
    Dataset<Row> rows = session.read()
      .format("kafka")
      .option("kafka.bootstrap.servers", "localhost:" + kafkaCtx.getBrokerListenPort())
      .option("subscribe", topic)
      .option("startingOffsets", "earliest")
      .load();

    rows.printSchema();

    List<Row> rowList = rows.collectAsList();
    Row row = rowList.get(0);
    String strKey = new String(row.getAs("key"), "UTF-8");
    String strValue = new String(row.getAs("value"), "UTF-8");
    assert(strKey.equals("dummy"));
    assert(strValue.equals("Hello, world"));
  }

  SparkSession startNewSession() {
    SparkSession session = SparkSession.builder().appName("test").master("local[*]").getOrCreate();
    session.sqlContext().setConf("spark.sql.shuffle.partitions", "1");   // cuts a few seconds off execution time
    return session;
  }
}
AbstractKafkaSinkTest delegates to its subclasses the decision of what kind of context (embedded or containerized) will be returned from getKafkaContext() (line 9, above). EmbeddedKafkaSinkTest, for example, offers up an EmbeddedKafkaContext, as shown on line 3 of the listing below.
public class EmbeddedKafkaSinkTest extends AbstractKafkaSinkTest {
  KafkaContext getKafkaContext() throws ExecutionException, InterruptedException {
    return new EmbeddedKafkaContext(topic, kafkaBrokerListenPort);
  }

  @Test
  public void testSparkReadingFromKafkaTopic() throws Exception {
    super.testSparkReadingFromKafkaTopic();
  }
}
The most interesting thing about EmbeddedKafkaContext is how it makes use of the EmbeddedKafkaBroker class provided by spring-kafka-test. The associated action happens on lines 10-15 of the listing below. Note that we log the current run’s connect strings for both Zookeeper and Kafka. The reason for this is that — with a bit of extra fiddling — it actually is possible to use Kafka command line tools to inspect the Kafka topics you are reading/writing in your tests. You would need to introduce a long running (or infinite) loop at the end of your test that continually sleeps for some interval then wakes up. This will ensure that the Kafka broker instantiated by your test remains available for ad hoc querying.
public class EmbeddedKafkaContext implements KafkaContext {
  final Logger logger = LoggerFactory.getLogger(EmbeddedKafkaContext.class);
  private final int kafkaBrokerListenPort;
  private final String bootStrapServers;
  private final String zookeeperConnectionString;

  EmbeddedKafkaContext(String topic, int kafkaBrokerListenPort) {
    this.kafkaBrokerListenPort =  kafkaBrokerListenPort;

    EmbeddedKafkaBroker broker = new EmbeddedKafkaBroker(1, false, topic);
    broker.kafkaPorts(kafkaBrokerListenPort);
    broker.afterPropertiesSet();
    zookeeperConnectionString = broker.getZookeeperConnectionString();
    bootStrapServers = broker.getBrokersAsString();
    logger.info("zookeeper: {}, bootstrapServers: {}", zookeeperConnectionString, bootStrapServers);
  }

  @Override
  public int getBrokerListenPort() {
    return kafkaBrokerListenPort;
  }
}

public class EmbeddedKafkaSinkTest extends AbstractKafkaSinkTest {
  KafkaContext getKafkaContext() throws ExecutionException, InterruptedException {
    return new EmbeddedKafkaContext(topic, kafkaBrokerListenPort);
  }

  @Test
  public void testSparkReadingFromKafkaTopic() throws Exception {
    super.testSparkReadingFromKafkaTopic();
  }
}
Embedded Broker Based Testing Downsides: Dependency Hell
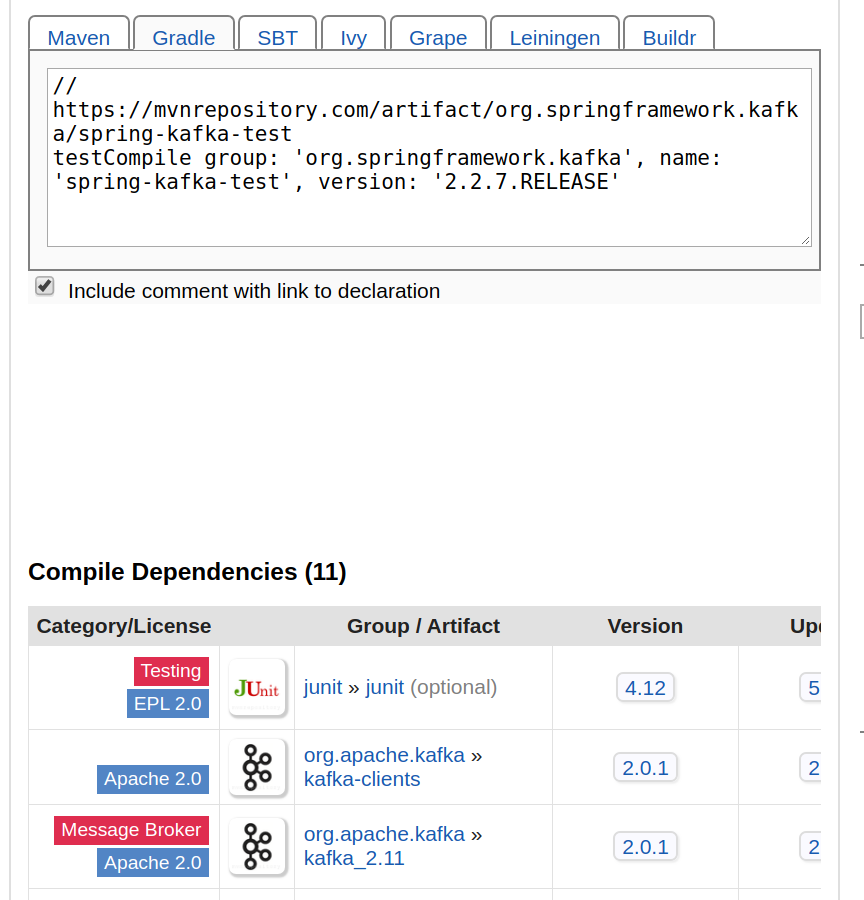
We mentioned earlier that one upside of Dockerized testing is the ability to avoid dependency conflicts that otherwise could arise as a result of bringing in a new test library, or upgrading Spark (or other third party components) after you finally manage to get things to work. If you pull the sample project code and execute the command git checkout first-article-spark-2.4.1 you will see that for this version of Spark we used an earlier version of spring-kafka-test (2.2.7.RELEASE versus 2.4.4.RELEASE, which worked for Spark 3.0.1). You should be able to run gradlew clean test integrationTest just fine with this branch in its pristine state. But note the lines at the end of build.gradle in this version of the project:
configurations.all {
  resolutionStrategy {
    force 'com.fasterxml.jackson.core:jackson-databind:2.6.7.1'
  }
}
If you were to remove these lines our tests would fail due to the error “JsonMappingException: Incompatible Jackson version: 2.9.7“. After some digging we found that it was actually spring-kafka-test that brought in version 2.9.7 of jackson-databind, so we had to introduce the above directive to force all versions back down to the version of this dependency used by Spark.
Now after putting those lines back (if you removed them), you might want to experiment with what happens when you upgrade the version of Spark used in this branch to 3.0.1. Try modifying the line spark_version = "2.4.1" to spark_version = "3.0.1" and running gradlew clean test integrationTest again. You will first get the error “Could not find org.apache.spark:spark-sql_2.11:3 0.1.“. That is because Scala version 2.11 was too old for the Spark 3.0.1 team to release their artifacts against. So we need to change the line scala_version = "2.11" to scala_version = "2.12" and try running our tests again.
This time we see our tests fail at the very beginning, in the setup phase, with the error “NoSuchMethodError: scala.Predef$.refArrayOps([Ljava/lang/Object;)Lscala/collection/mutable/ArrayOps“. This looks like we might be bringing in conflicting versions of the Scala runtime libraries. Indeed if we look at the dependency report for spring-kafka-test version 2.2.7.RELEASE we see (at the bottom of the page reproduced below) that this version of spring-kafka-test brings in org.apache.kafka:kafka_2.11:2.0.1. This is a version of Kafka that was compiled with Scala 2.11, which results in a runtime clash between that version and the version that Spark needs (2.12). This problem was very tricky to resolve because the fully qualified (group/artifact/version) coordinates of spring-kafka-test:2.2.7.RELEASE offer no hint of this artifact’s dependency on Scala 2.11.
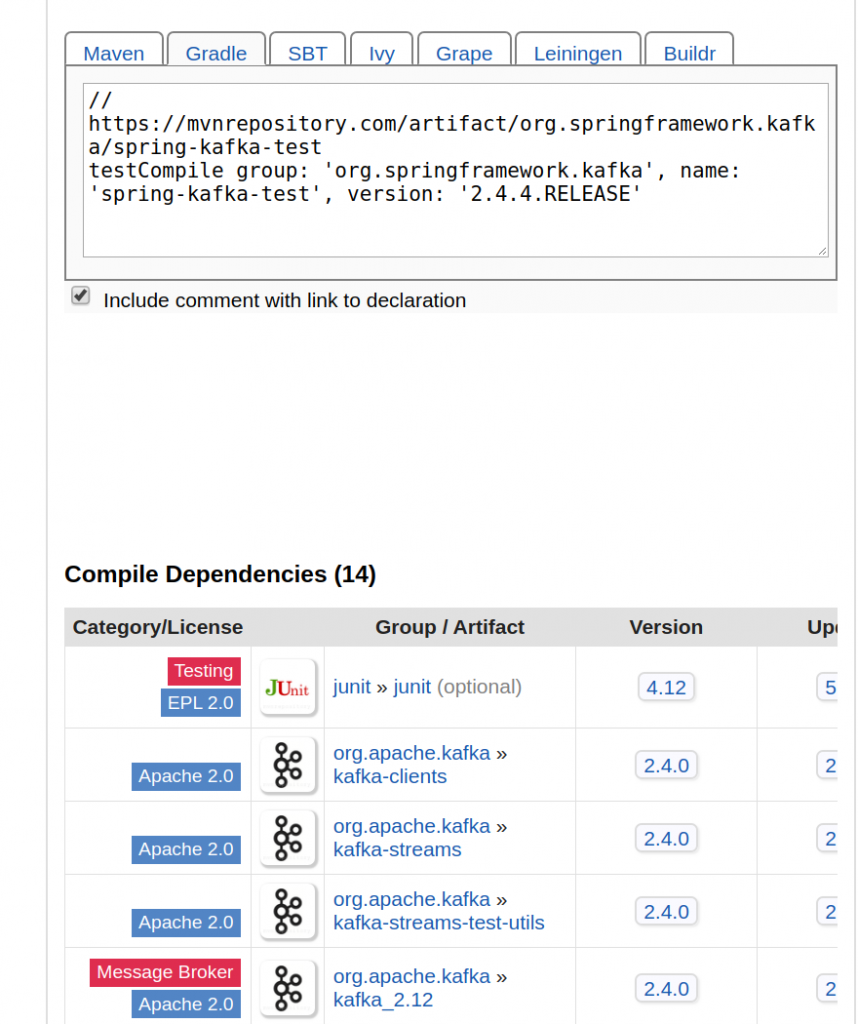
Once I realized there was a Scala version conflict it was a pretty easy decision to hunt around for a version of spring-kafka-test that was compiled against a release of Kafa which was, in turn, compiled against Scala 2.12. I found that in version 2.4.4, whose abbreviated dependency report is shown below.
Hopefully this recap of my dependency-related suffering gives you some motivation to give Docker-based testing a try !